Pipedrive is the best CRM for SMBs.
Ok, I don’t have enough numbers to prove that, but I’m sure it’s really the best CRM for SMBs. At Route, we use Pipedrive everyday to manage our leads and help them advance through our sales pipeline and become happy customers.
And like us, thousands of companies do the same, but almost all of them stumble upon the same problem: how to align my marketing strategy with my sales pipeline, or how to be more productive once I’ve got more leads?
Obviously we don’t have answers to all questions related to these problems, but we’ve developed a great software that can address some common problems related to managing marketing and sales tasks and get Pipedrive aligned with your marketing strategy.
Today we’ll discuss some techniques that you can use to extract the best from Route + Pipedrive in 5 steps:
First Step: Setup integration
Second Step: Import your current Pipedrive leads
Third Step: Keep contacts synced
Fourth Step: Create a lead nurturing flow or engagement campaign
Fifth Step: Create Deals automatically on Pipedrive
Sixth Step: Update your sales info on Route
First Step: Setup integration
Integrating Route and Pipedrive is quite simple in fact.
All you need to do is go to your Integrations page on Route and click the Pipedrive logo, listed under the 3rd Party Integrations. This is pretty straight-forward, so skip this step if you’re familiar with Route. However, keep reading if you aren’t confident enough.
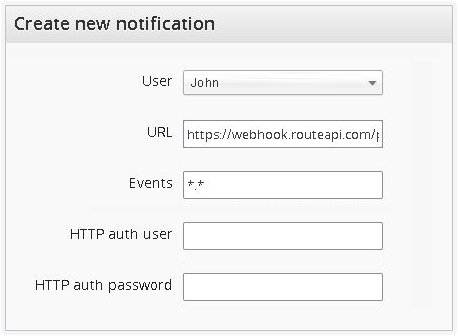
To complete the setup, you’ll need your Pipedrive API key and access to create push notifications in your Pipedrive account. So copy the first one (API key) on your Settings > Personal page from Pipedrive and paste it on the first Pipedrive integration setup screen on Route.
Next, Route will ask you to create the push notification in your Pipedrive account, as shown in the image below:
Once you have created this, click Next to advance to the next setup integration screen wherein Route will test if everything is ok with your setup. Then, it’ll let you map the Pipedrive events you want to track with Route (I’d suggest all for this tutorial). Once you’re done, click Next.
On the next screen, you’ll map the contact attributes, and we strongly recommend that you map at least the basic ones such as name, email, company, etc.
Now, everytime an event takes place in Pipedrive it will be tracked by Route, and every person that you add to your CRM will be identified by Route too.
You might be thinking: if I add a new person directly to Route, my Pipedrive won’t capture that information?
The answer to this question lies in the next step!
Second Step: Import your current Pipedrive leads
This step could be called Import all your Pipedrive leads but I think that isn’t the best approach. All of Route’s plans are based on the number of contacts that you have. Now, you don’t want to be charged for old leads that probably won’t buy from you, right?
Which is why this step is important. In Pipedrive, you can view your current sales pipeline and export just the leads that are important for you. If you have more than one important pipeline, then you can create a filter using the awesome search tool provided by Pipedrive and export all of them in a single CSV file.
The best choice will depend on your objectives with marketing automation. I’ll give some suggestions below, but the final decision to make rests upon your shoulders.
In Route, you can import any CSV file using our Integrations > Imports feature. When you do an import, you create a ‘list’ with all the imported contacts and later on, you can filter your imported contacts using this list.
So, it would be very useful to export your pipelines, one by one, from Pipedrive and then import them into Route using different lists. Or, you could use the ‘pipeline stage’ based approach, which is a tad-bit harder but offers a greater accuracy.
Importing your current leads will let you start your marketing automation campaigns faster, especially broadcasts. Broadcasts send massive email messages or SMSes to everyone that meets certain conditions that you’d specified at that moment, which was let’s say to be part in a specific list, for example.
This is very useful for re-warming leads that became cold.
Note that Route plans get more expensive as and when your contact base grows, and maybe you aren’t ready to implement this step right now as you’ll be required to pay more to use Route. But don’t worry. Let us know your use case and we can negotiate and come to an agreement that works for you.
Second step: check!
Third Step: Keep contacts synced
Once the setup is complete in step 1, everything that happens inside Pipedrive will be tracked by Route. In step 2, you saw how to bring just the leads that are important to you to Route and also, how to work out some simple strategies using broadcasts. But this isn’t enough if you really want to sync Route and Pipedrive, right?!
Now, we’ll create the first automation using Route + Pipedrive, aiming to send all contacts added to Route immediately to Pipedrive. Later on, we’ll see how to create Deals and change Pipeline Stages automatically.
To do this is go to Campaigns > Automations and click the “New Automation” button at the top-right corner.
First of all, create a name for this automation, such as “Keep Route + Pipedrive Synced”.
Next, look at the left pane: Triggers.
Here, you’ll set the conditions that’ll trigger this automation. If you want every contact entering Route to be sent to Pipedrive, you can choose a generic and ‘always true’ condition, like “Email exists” under the “Attributes” category. So, every time a new contact gets added, and if they have an email address, the automation will be triggered. In fact, every contact in Route has to have an email address, so this automation will be triggered for everyone.
Last, look at the right pane: Actions.
Here we’ll define the actions that will take place once the trigger gets activated. Generally, our customers use the Email action to send messages to their contacts, but now I’ll ask you to use the Pipedrive action under the “Send contact data to…” option.
A Pipedrive action box will appear in your Actions pane, with an ‘immediately’ label above it, implying that the action will take place at the exact moment that the contact enters our database.
Inside the Pipedrive box, you’ll find some checkboxes to configure this Pipedrive action. The first one is already checked and says ”Add a new person only if he(she) doesn’t exist”, implying that the contact will be created only if it is a new one. I’d recommend that you check the second one too, which says “Update this person if he(she) already exists”.
And lastly, we’ll check the third option “Add a new Organization if it doesn’t exist” that will create the organization and add the person to it.
Enable your automation and click the Save button at the top-right corner.
Third step: check!
Fourth Step: Create a lead nurturing flow or an engagement campaign
Now that all your customer/lead information is synced between Pipedrive and Route, it’s time to start using the powerful marketing automation features of Route: let’s create our first lead nurturing flow or engagement campaign!
Lead nurturing is a science difficult to master without a lot of training and experimentation. And even with our team of experts to help you, we’ll need your own expertise with your customer’s market to be possible to create really effective lead nurturing campaigns. Find out everything you need to know about lead nurturing here.
So, before you proceed, you need to bear in mind (and especially on a paper) what exactly you want to do with your nurturing campaign.
You can create nurture campaigns that will teach your leads how to be better at using your product, how they can save money choosing a tool like yours or how they can solve a huge pain hiring your services.
Further, with a well-built engagement campaign, you can turn your existing customers into great customers, keeping them engaged and more willing to buy more from you.
I don’t want to focus on the techniques of building these kinds of campaigns, especially because I already did so in a previous post here in the blog. Let’s focus again on the Pipedrive + Route integration.
Using a pipeline based CRM such as Pipedrive is very handy to create lead nurturing campaigns and the native Pipedrive integration with Route gives the power to do so efficiently.
Let’s suppose that you have a nurture pipeline in Pipedrive, I mean, a pipeline with a lot of leads that are far from closing the deal with you. Maybe this is your main pipeline, but you care about only the first two or three stages.
Probably, the first stage of this pipeline gets its data from the contact form that subscribers fill on your website or from another lead generation tool (as a blog, free trial, etc). It would be great if you could automate your first 2-3 interactions with these leads, right? So, let’s roll up our sleeves and do it.
First, make sure that all your new leads come to Route instead of entering Pipedrive directly. If you already set up the first campaign as mentioned in the last step, it’s almost done, because all leads that will be added to your Route account will automatically be in your Pipedrive account.
But for them appear in a pipeline, you have to make some changes.
Go to the campaign that you created in the previous step. I’ll wait.
Done? Ok.
On the actions pane (the right one) you have a Pipedrive action, right? Click on Edit to make changes.
One of the options here is “Add a deal…”. Check it and you’ll have to configure more info such as the deal’s name (what are you trying to sell?), the deal’s value (how much it costs?), the deal’s owner (who is responsible to this sale?), the deal’s status (Open, generally) and the deal’s pipeline and stage (choose the right one, probably the nurture pipeline).
Save your automation. Now, not only will all contacts be synced through Route and Pipedrive, but new deals will be added to your Pipedrive account, for every new contact that needs to be go through your lead nurturing pipeline.
But this isn’t all!
Below the Pipedrive action, we can start our nurturing flow, to save your sales team’s time and make the first contact with this lead.
Click New Action and Email.
Think about a first welcome message to be sent to everyone that reaches your Route account. Write a plain-text email with a “Hi” and say that in few days (or hours) your contact will receive more emails from you, offering some tips or something else that would be useful to your contact, such as an ebook, video, or something that your audience would truly appreciate.
Note that this dependes on what you did to convince your visitors to subscribe. Ecommerces generally promise discounts, and you can offer the promised discount in this email via coupons or discount links, for example.
You can create more emails in this flow, giving a time span between them, such as a day or a week, for example. As you prefer.
Save your automation and it’ll start working for you, sending emails to everyone.
“Wait Mr. Marketing Automation Specialist, if my lead becomes a customer in the middle of the flow, I don’t want to send nurture messages to them anymore.”
Fifth Step: Automatically create Deals, Activities and Notes on Pipedrive
While setting up the action to send contact data to Pipedrive, you’ll be able to create Deals, Activities and Notes on Pipedrive.
With this option, you can track important behavior and characteristics using Route to segment and update (or add) contacts on your CRM by sending them to specific funnels and stages. You can add notes so that your sales team gets more information about the lead and you can assign to your team activities that you want them to complete once they receive a new lead.
For example, you can add an email activity for a contact you send to Pipedrive to alert your team that they need to send a follow-up email to a lead that showed real interest on your service or product. You can add a call activity based on behaviors you’re tracking that shows you the lead is getting closer to the bottom of your funnel, which in turn is the right time for a sales call.
Now you know how to automate your entire sales funnel using Route to send information to Pipedrive.
But you can also improve your marketing efforts by sending information from Pipedrive to Route.
Here’s how.
Sixth Step: Update your sales info on Route
By now you know that you can automatically send contact information, add new Deals and Activities to your sales pipeline on Pipedrive. This is great for your sales efforts.
But sometimes people that you send to your CRM won’t be ready to buy yet. It might seem that they were ready but after contacting them they go from hot leads to cold ones. This is the time to set up your re-engagement campaign.
Another case would be sending an automated follow-up email once you update a contact with the information that you just called them. You could do it manually, but automating this task can save you a lot of time.
I’m sure there are other use cases, but the main idea here is: you can use Pipedrive data to automate tasks using Route.
By default, Pipedrive sends all events related to contact updates or new contacts to Route. You’ll be able to find this information on your contacts timeline. But you can do more than just take a look at this data.
You can use this data to create campaigns in Route.
Our integration with Pipedrive works both ways, so you can update your pipeline using Route and update Route using Pipedrive.
One Last Step: Connect Route and Pipedrive
Now that you know our Marketing Automation platform and your Pipedrive CRM are a perfect fit, it’s time to set everything up to start getting all the benefits from a marketing and sales automation strategy.